insanelab.com insanelab.com

March 4, 2019 - Mobile Development

Advanced lists in Xamarin Android with MvvmCross

1. Advanced Xamarin Android Lists with Insane Lab!

Have you ever tried to implement any of those fancy features you’ve seen in Google applications like:

  • Swipe To Delete,
  • Grouped lists,
  • Expand/Collapse

in your Xamarin Android application?

Have you ever needed to quickly implement a list (i.e. RecyclerView) with a Header or Footer?

Maybe you have accomplished any one of these tasks, but you are also an #MvvmCross fanatic (just like we are ?). And, maybe you are frustrated at the complexity of the repetitive tasks in regards to implementation of advanced lists features or just at the lack of data bindings support that exists for this framework?

If you have nodded your head at least once during this introduction, you will be thrilled to hear that we have the solution to your problems with Insane Lab’s library, MvvmCross.AdvancedRecyclerView !

MvvmCross.AdvancedRecyclerView is an AdvancedRecyclerView MvvmCross wrapper.

It adds MvvmCross-style data bindings to the AdvancedRecyclerView , a library which implements inter alia: high-performance Expandable Grouped Lists, Swipe-To-Delete, Header and Footer RecyclerView support.

In addition to the MvvmCross support package, we also have a published Xamarin Android bindings library for AdvancedRecyclerView.  Just check this awesome library out in action: https://github.com/h6ah4i/android-advancedrecyclerview. (Thanks Haruki Hasegawa !)

2. A Harsh Lesson Learned – Do Not Reinvent the Wheel!

In the past, I have tried to implement grouped lists completely on my own, and a few of them even went into official MvvmCross NuGet channels for some time. The problem was that I made one of the biggest mistakes a software developer can make. I tried to prove I was smarter than my peers and ended up reinventing the wheel.

During the initial testing and implementation of my project, I ran into a lot of bugs and its performance was insufficient. Therefore, my list contribution had to be temporarily removed from MvvmCross.

I soon realized that implementing a grouping is an extremely difficult task. That is why developers should seek out ready-to-use yet customizable solutions. Situations like this can also serve as a distinction between experts and novices. After gaining years of software development experience, developers typically achieve a certain level of humility. They often come to realize that a simple problem can turn out to have a lot of tricky edges after the test and release phase. Nevertheless, instead of trying to fix my initial project at all costs, I decided to explore an easier way to solve my grouping problem with a generic yet editable solution.

I happened to recall that I have used (and even published) some Pull Requests to the existing library that implemented the expandable lists (AdvancedRecyclerView). I looked at this library’s Java Code once again and saw that it was quite complex. Thus, instead of coding all of the logic in Xamarin, I chose to simplify the original library and create MvvmCross, an easy-to-use plug-in support library. This also wasn’t as easy as I thought though. ?

Harsh lesson learned. If you plan to implement considerably complex features, look at similar open source codes first. If what you are trying to achieve looks like it will be difficult, borrow as much as possible from other people’s previous work (IF LICENSE ALLOWS ?).

3. So, What Are We Going to Achieve with AdvancedRecyclerView ?

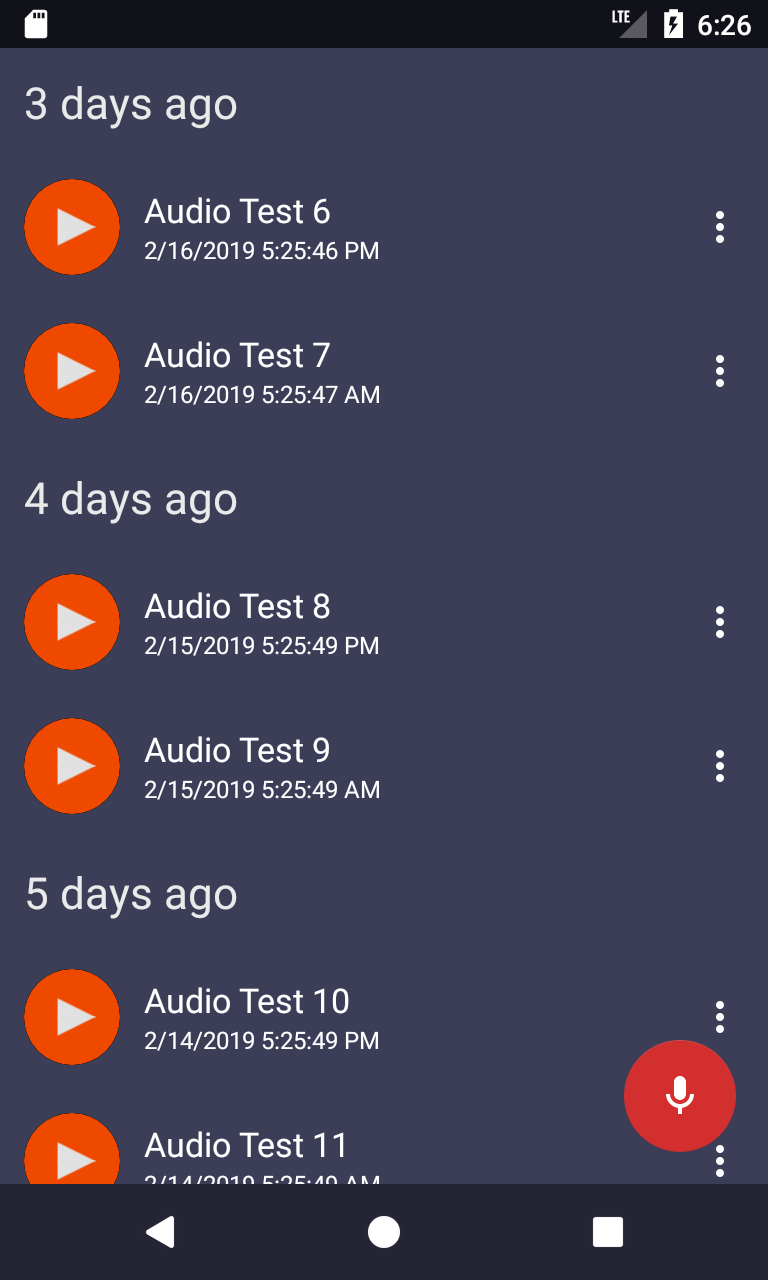
We are going to build grouped list with swipe to delete list item. Later, we will extend this list to support an “Expand”/”Collapse” application.

This list will be a part of the Audio Recorder application, and it will contain recorded audio elements grouped by date (see picture below).

4. Let’s Setup the Project!

First, you need to create Xamarin MvvmCross projects. If you are not familiar with MvvmCross, go through official tutorials before you proceed!

If you already have your MvvmCross project ready, the next thing you will need to do is install our NuGet package. Look for MvvmCross.AdvancedRecyclerView .

You will also need a DynamicData package, which is an RX based library that helps with managing observable lists.

As for the user interface, we are going to implement the following three: .axml files – Main Layout with AdvancedRecyclerViewGroup header template (date header), and group child item template (audio recording item)

To support our UI with logic, we will create an Audio Recording list ViewModel (which will provide data for our lists).


5. Supplying lists with data – Audio Recording ViewModel

  public class MainViewModel : ListViewModel<string, AudioItem, GroupedData<DateTime, AudioItem>>
    {
        int i = 0;
        public MainViewModel()
        { 
        }
        
        public override void Prepare(string parameter)
        {
             
        }
        
        protected override Task<IEnumerable<AudioItem>> GetItems(int startIndex)
        { 

            return Task.FromResult(Enumerable.Empty<AudioItem>());
        }

        protected override IObservable<IChangeSet<GroupedData<DateTime, AudioItem>>> GetObservableChangeSet()
        {
            return ItemsSource
                .Connect()
                .Sort(SortExpressionComparer<AudioItem>.Descending(x => x.CreatedDateUtc)) 
                .GroupOn(x => x.CreatedDateUtc.Date)
                .Transform(CreateAudioItemGroup);
        }
   
        private GroupedData<DateTime, AudioItem> CreateAudioItemGroup(IGroup<AudioItem, DateTime> group)
        {
            var audioItemGroup = new GroupedData<DateTime, AudioItem>()
            {
                Key = group.GroupKey
            };

            ReadOnlyObservableCollection<AudioItem> audioItemChildCollection;
            var subscriptions = group.List
                .Connect()
                .Sort(SortExpressionComparer<AudioItem>.Descending(x => x.CreatedDateUtc).ThenByDescending(x => x.Title))
                .ObserveOn(SynchronizationContext.Current)
                .Bind(out audioItemChildCollection)
                .Subscribe();

            DisposableItems.Add(subscriptions);

            audioItemGroup.ChildItems = audioItemChildCollection;
            return audioItemGroup;
        }


        public MvxCommand Record => new MvxCommand(() => {
                i++;
                ItemsSource.Add(new AudioItem
                {
                    AudioUri = new Uri("https://www.insanelab.com"),
                    CreatedDateUtc = DateTime.UtcNow.Subtract(TimeSpan.FromHours(12 * i)),
                    Title = "Audio Test " + i
                });
            }
        );

        public MvxCommand<AudioItem> PinToDelete => new MvxCommand<AudioItem>(item => { ItemsSource.Remove(item); });
    }

Our audio recording list view model inherits from an abstract ListViewModel . The purpose  of this is to help with managing the following list states:

  • is list empty?
  • should we show empty list view?
  • handling of item tap action
  • managing state of DynamicData (dispose when we are not using it anymore)

On the other hand – MainViewModel implements the required ListViewModel methods such that:

  • it “converts” items source to observable list with DynamicData – so if data list changes – UI will automatically reflect the changes
  • it supplies the list with some DynamicData operators – we sort the list by date, we group it by date and then transform it to the appropriate model
  • it supplies view with recording command such that we can “mock” audio recording operations by adding random items to the list
  • it supplies view with delete operation – so we can delete an item from the list on swipe to delete


6. Plug-in AdvancedRecyclerView into .axml Layout

You can browse ready layouts here (as I will discuss only the AdvancedRecyclerVIew part). The main layout is extended with an animated “empty list” view handling.

To add a grouped AdvancedRecyclerView list you simply need to add in your .axml:


 <mvvmcross.advancedrecyclerview.MvxAdvancedExpandableRecyclerView
                android:id="@+id/recyclerView"
                android:layout_width="match_parent"
                android:layout_height="match_parent"
                local:MvxGroupedDataConverter="@string/audio_grouped_data_converter"
                local:MvxGroupExpandController="@string/audio_group_expand_controller"
                local:MvxTemplateSelector="@string/audio_item_template_selector"
                local:MvxBind="ItemsSource Items; ChildItemClick ItemTapped" />

To add a grouped list with an expand/collapse feature, we have to fill a few attributes.

local:MvxGroupedDataConverter

We have to implement MvxExpandableDataConverter. This is used to convert your Items DataSource to a grouped data source, so-called, MvxGroupedData.

Our ViewModel/DataModel contains an item which has:

  • Child items (items inside the group),
  • Key (an object to which every group layout DataContext will be bound)
  • Unique ID for every group.
  • Unique ID for each child item (AdvancedRecyclerView requires it internally)
 public class AudioListGroupedDataConverter : MvxExpandableDataConverter
    {
        readonly Dictionary<long, int> _longToSmallIntMap = new Dictionary<long, int>();
        private int currentId = 0;
        
        public override MvxGroupedData ConvertToMvxGroupedData(object item)
        {
            var groupedData = item as GroupedData<DateTime, AudioItem>;

            return new MvxGroupedData()
            {
                GroupItems = groupedData.ChildItems,
                Key = groupedData.Key,
                UniqueId = GetId(groupedData.Key.Ticks)
            };
        }

        protected override long GetChildItemUniqueId(object item)
        {
            var audioItem = item as AudioItem;
            return GetId(audioItem.CreatedDateUtc.Ticks);
        }

        private int GetId(long longId)
        {
            if (!_longToSmallIntMap.ContainsKey(longId))
                _longToSmallIntMap.Add(longId, currentId++);

            return _longToSmallIntMap[longId];
        }
    }
local:MvxGroupExpandController

We have to implement MvxGroupExpandController . This controls how the expand/collapse feature behaves. We can block expand/collapse for some groups. We can also set it for all groups to be expanded on start.

If you want to use default implementation, all groups can be expanded/collapsed. All groups are expanded by default just use: “@string/DefaultMvxGroupExpandController“.

If your feature requires accordion, and, only one group can be expanded at a time, use: “@string/AccordionMvxGroupExpandController

In our application, we use MvxGroupExpandController which forbids expanding and collapsing.

 public class AudioListGroupExpandController : MvxGroupExpandController
    {
        public override bool CanExpandGroup(MvxGroupDetails groupDetails)
        {
            return false;
        }

        public override bool CanCollapseGroup(MvxGroupDetails groupDetails)
        {
            return false;
        }

        public override bool OnHookGroupExpand(MvxHookGroupExpandCollapseArgs groupItemDetails)
        {
            return true;
        }

        public override bool OnHookGroupCollapse(MvxHookGroupExpandCollapseArgs groupItemDetails)
        {
            return true;
        }
    }
local:MvxTemplateSelector

We have also implemented a special MvxTemplateSelector with support for groups, which is MvxExpandableTemplateSelector. 

This class decides which layout should be shown for a group header and which should be shown for a group child item for a given data context object.


 public class AudioItemTemplateSelector : MvxExpandableTemplateSelector
    {
        public AudioItemTemplateSelector() : base(Resource.Layout.audio_item_template_group_header)
        {
        }

        protected override int GetChildItemViewType(object forItemObject)
        {
            return Resource.Layout.audio_item_template;
        }

        protected override int GetChildItemLayoutId(int fromViewType)
        {
            return fromViewType;
        }
    }

Keep in mind that each attribute should point to a string value in the following format:

Namespace.ClassName, AssemblyName

<?xml version="1.0" encoding="utf-8"?>
<resources>
    <string name="audio_grouped_data_converter">
        RecordGuard.ListSample.Android.Extensions.Grouping.AudioListGroupedDataConverter, RecordGuard.ListSample.Android
    </string>

    <string name="audio_group_expand_controller">
        RecordGuard.ListSample.Android.Extensions.Grouping.AudioListGroupExpandController, RecordGuard.ListSample.Android
    </string>

    <string name="audio_item_template_selector">
        RecordGuard.ListSample.Android.Extensions.TemplateSelectors.AudioItemTemplateSelector, RecordGuard.ListSample.Android
    </string> 
</resources>

7. Let’s Add Swipe to Delete!

To improve the user experience, we can quickly add “swipe to delete” on the Audio List item. This was a feature popularized by Google’s e-mail app.

There are a few steps that must be done:

  • add MvxChildSwipeableTemplate attribute to your layout file
  • implement MvxSwipeableTemplate abstract class – which controls the Swipe to Dismiss feature (is left/right/top/bottom swipe enabled, action on swipe)
  • adjust your item template .axml layout so that it contains “hidden” swipe container
  • optionally subscribe to Pinned/Unpinned events (to invoke additional action on the pinned to edge swipe)

The source code of the required changes is presented below.

<?xml version="1.0" encoding="utf-8"?>
<FrameLayout android:layout_width="match_parent"
    android:layout_height="wrap_content"
    xmlns:android="http://schemas.android.com/apk/res/android"
    xmlns:local="http://schemas.android.com/apk/res-auto"    >
    
  <!-- this is the container under swipe - visible during swiping --> 
    <RelativeLayout
        android:layout_width="match_parent"
        android:layout_height="match_parent"
        android:id="@+id/underSwipe"
        android:background="@drawable/bg_swipe_item_state_swiping"
        android:paddingRight="16dp">
        <ImageView
            android:layout_width="wrap_content"
            android:layout_height="wrap_content"
            android:layout_alignParentRight="true"
            android:layout_centerVertical="true"
            android:src="@drawable/delete"/>
    </RelativeLayout>

   <!-- this is default container, visible by "default" -->
    <LinearLayout
        android:orientation="horizontal"
        android:layout_width="match_parent"
        android:layout_height="wrap_content"
        android:id="@+id/container"
        android:clickable="true"
        android:padding="12dp"
        android:background="@drawable/bg_swipe_item_state_normal">
        <com.recordguard.PlayPauseView
            android:id="@+id/play_pause_view"
            android:layout_width="48dp"
            android:layout_height="48dp"
            android:layout_gravity="center"
            android:clickable="true"
            android:foreground="?android:selectableItemBackground"
            local:fill_color="#e1e1e1"
            local:pause_bg="#FF631A"
            local:play_bg="#EF4900"/>
        <LinearLayout
            android:layout_width="0dp"
            android:layout_height="wrap_content"
            android:layout_weight="1"
            android:layout_gravity="center"
            android:orientation="vertical"
            android:layout_marginLeft="12dp"
            android:layout_marginRight="12dp">
            <TextView
                android:layout_width="match_parent"
                android:layout_height="wrap_content"
                android:textSize="17sp"
                android:textColor="#FFFFFF"
                android:layout_gravity="center_vertical|left"
                local:MvxBind="Text Title" />
            <TextView
                android:layout_width="match_parent"
                android:layout_height="wrap_content"
                android:textSize="12sp"
                android:text="data"
                android:textColor="#FFFFFF"
                android:layout_gravity="center_vertical|right"
                local:MvxBind="Text CreatedDateUtc" />
        </LinearLayout>
        <ImageView
            android:layout_width="wrap_content"
            android:layout_height="wrap_content"
            android:layout_gravity="center"
            android:id="@+id/overflow_item"
            local:srcCompat="@drawable/overflow_icon" />
    </LinearLayout>
</FrameLayout>
   public class ChildSwipeableTemplate : MvxSwipeableTemplate
    {
        public override int SwipeContainerViewGroupId => Resource.Id.container;
        public override int UnderSwipeContainerViewGroupId => Resource.Id.underSwipe;

        public override int SwipeReactionType => SwipeableItemConstants.ReactionCanSwipeBothH;

        public override float MaxLeftSwipeAmount => -1f;
  
        public override MvxSwipeResultActionFactory SwipeResultActionFactory => new SwipeResultActionFactory();
    }
public class SwipeResultActionFactory : MvxSwipeResultActionFactory
    {
        public override SwipeResultAction GetSwipeLeftResultAction(IMvxSwipeResultActionItemManager itemProvider)
        {
            return new MvxSwipeToDirectionResultAction(itemProvider, SwipeDirection.FromLeft);
        }

        public override SwipeResultAction GetSwipeRightResultAction(IMvxSwipeResultActionItemManager itemProvider)
        {
            return new MvxSwipeUnpinResultAction(itemProvider);
        }

        public override SwipeResultAction GetUnpinSwipeResultAction(IMvxSwipeResultActionItemManager itemProvider)
        {
            return new MvxSwipeUnpinResultAction(itemProvider);
        }
    }
// inside your Activity/Fragment where AdvancedRecylerView lies
     private void SetupRecyclerView()
        {
            var recyclerView = FindViewById<MvxAdvancedRecyclerView>(Resource.Id.recyclerView);

            var mvxExpandableItemAdapter = recyclerView.AdvancedRecyclerViewAdapter as MvxExpandableItemAdapter;
           
            mvxExpandableItemAdapter.ChildSwipeItemPinnedStateController.ForLeftSwipe().Pinned += (item) =>
                {
                    ViewModel.PinToDelete.Execute(item);
                };
        }

We have added an “under swipe” container inside our item template layout.

Our MvxSwipeableTemplate implementation sets appropriate ids for Swipe and Under Swipe views. We have enabled horizontal swipe using the appropriate SwipeReactionType constant and set the maximum range for -1 (which is equal to the view width in the left direction).

We have also implemented SwipeResultActionFactory. There are two default actions:

  • MvxSwipeToDirectionResultAction – after swipe, we pin the item to the left edge (so it sticks in “swiped” state)
  • MvxSwipeUnpinResultAction – after right swipe, we unpin the item from it’s pinned edge

As we use “swipe to left to delete,” we have subscribed to the pinned item event (adapter.ChildSwipeItemPinnedStateController.ForLeftSwipe().Pinned += ) and invoked the “Delete” command there.

The final result is presented in the video below.

8. How Do I Deal with Advanced Lists in my Xamarin Projects?

To better understand this walkthrough, check out the full code sample which is available here (RecordGuard.Sample project).
It might seem complicated at first because the whole concept of grouping/expandable/header/footer/swipe is very complex to implement on an Android platform.

The same scenario looks easier on iOS because a built-in UITableView supports the grouping, headers, footers and swipe by default… and MvvmCross adds support for expandable lists.

There is also support for accordion expandable lists which I pushed to the MvvmCross repository a few years ago 🙂

Nevertheless, if you need immediate help with MvvmCross.AdvancedRecyclerView, make sure you check the GitHub documentation. I have listed the common user-stories and steps you will need to take to tackle your project.

by the way – are you curious how the sample we have prepared fits into a real app? Check out the video below to see how it looks like in RecordGuard – our audio recorder application!

Are you interested in cyclic articles about Xamarin development?
Would you like to see tutorials per feature that we have built-in to the Android version of RecordGuard (just like the material designed, MvvmCross based, audio recorder application presented above with full usage of animations on Android)?
Would you like to see how we added an iOS version using the shared code we have developed for Android?

If so – share, leave us a comment and give some feedback !

What is your challenge?

Tell us with any means provided. We'd love to hear from you!